O Factor, Where Art Thou?

The DHL Packstation is a great thing. Think of it as a vending machine. But instead of sweets and soda, this one dispenses precious DHL parcels. And instead of quarters and dimes it takes a swipe card and a one-time-password (“mTAN”) that comes via text message to your cell phone. Okay, a let’s call it a vending machine with multi-factor authentication. But, why is so much security necessary? Packstation sign-up requires the applicants to have their ID verified in a DHL shop which inconvenient and risky for criminals. As a result, criminals immediately profit from the compromise of already existing accounts as it allows them to receive parcels anonymously. This includes goods that were ordered through credit card fraud to anything the dark net has to offer such as firearms or drugs.

Packstation Authentication

A closer look at the swipe card reveals that the magstripe simply contains the account number (“Postnummer”) and this number is not a secret at all. It is more like a username encoded on a physical card. This number is well-known to the user as it must be provided as part of the postal address every time the user wants to receive a parcel through a Packstation. Cards with arbitrary account numbers can be created with any magstripe writer. In total, the swipe card is a pseudo first factor.

The Packstation account can be managed through a web interface. To do so, a password must be provided together with the account number. Alternatively, the email address attached to the account may be used instead of the account number. Therefore, Packstation account number/email address and password make up a perfect target for phishing and malware. To mitigate this fraudulent usage, “mTAN” was introduced. However, the mobile number used for “mTAN” may be modified through the web interface. An attacker with access to the account number and password may reset the mobile number to an attacker-controlled mobile number and is therefore able to retrieve the mTAN. The downside using this procedure is that the Packstation web application informs the old mobile number of the change and it sends a confirmation link to the email address registered with the account. Additionally, the attacker must obtain a SIM card anonymously.

Recent Transition in mTAN Security

On June 5, DHL announced that their mobile app is now capable of retrieving the mTAN as well. However, all the DHL mobile app expects for authentication is the account number together with the password of the web interface. Just by this high-level analysis, it becomes clear that the newly introduced “feature” renders the mTAN factor completely ineffective: Anyone who is in possession of the account number and password is capable to retrieve the mTAN. Access to the mobile number (or the email address) stored with DHL is not required anymore.

A bit of reversing and a couple LoC later I had cobbled together a Python script that interfaces the DHL mTAN API just as the regular app does:

$ ./mtan.py hanno.heinrichs@[...].de DummyPass17
{"mTan":"2342"}

Sweet. I just collected my own mTAN. Likewise, an attacker who compromised my online credentials would be in possession of all information that is needed to retrieve my parcel. Thanks to heise Security, DHL has been informed on these findings.

Thoughts on Mitigation and Hardening

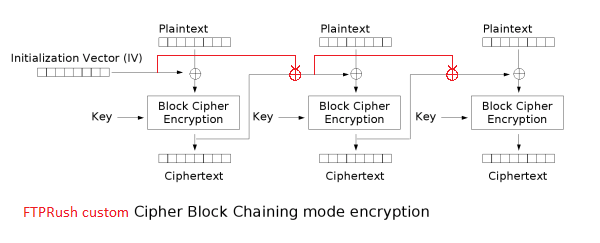
In order for the mTAN delivery by app to act as a true second factor, simplest a shared secret could be used. Such a secret could be a QR code that comes via personal registered mail and is scanned by the app once. This would allow transferred mTANs to be encrypted for a particular installation of the app. Attackers without access to the shared secret would not be able to decrypt the mTAN. Additionally, the shared secret should be exempt from mobile phone backups that are stored within the cloud or on a local computer. Even if your Apple ID or your computer were compromised, chances would be increased that the shared secret remains a secret. The security of mTAN delivery by text message could be improved if a mobile number change required physical ID verification just as initial sign-up does.

To make Packstation account phishing (i.e. account number and web interface password) pointless in general, the magstripe of the swipe card should be seeded with random data which uniquely identifies a user (e.g. a token that is linked to the user’s account). That data must be unknown to the user (to prevent phishing attacks) and may not be accessible to attackers by means other than dumping the magstripe of the targeted user. Thus, the swipe card would be elevated from a pseudo-first-factor-username-on-a-plastic-card to a true first factor and attackers without access to the swipe card data of the legitimate user could not authenticate towards a physical Packstation — even if they managed to obtain the currently valid mTAN.

Posted in default | Leave a comment

#Phreaking2016: Authentication Flaw in O2 (Telefónica) ACS

Today, the details on a major authentication flaw in the Auto Configuration Server (ACS) of the German ISP O2 (Telefónica) were released. A tl;dr could be “Tell me your IPv4 address and I may place and accept phone calls on your behalf!”. The good news is that the most severe part of this flaw has already been fixed. While the details are covered by heise Security, the c’t magazine (02/2016) and RedTeam Pentesting, this blog entry is meant to provide some background information on how this vulnerability was unintentionally identified by me.

During fall 2014 someone notified me, that a stock FRITZ!Box 7490 is able to automatically download VoIP credentials from the Telefónica / O2 ACS. This behavior was pretty much unexpected as O2 has a long history of  keeping the VoIP credentials a secret in order to enforce the use the CPE they provide. I tried to reproduce this on my own DSL connection and was finally able to man-in-the-middle the whole TR-069 provisioning process.

It turned out that for the initial connection to the ACS a generic set of credentials suffices to kick off the provisioning process during which the secret VoIP credentials are transferred to the FRITZ!Box 7490 CPE. This technique would have been an ideal replacement for the other VoIP credentials extraction techniques that existed at that time (see my other blog posts). Firstly, it does not include any tampering with leased O2 hardware. Secondly, I believe that it would cost O2 quite an effort to mitigate this extraction vector without disrupting the provisioning service for all customers. Thus, I was eager to turn the findings into code.

However, after I had coded a rudimentary TR-069 client which resembles a FRITZ!Box 7490, I encountered another surprise: The ACS “authenticates” the CPE (or my client) merely based on its WAN IP address and that address could spoofed as I found out later. In other words, I was able to retrieve VoIP credentials of arbitrary O2 customers only by knowing their IPv4 address. With these credentials at hand, attackers could have used the victim’s telephone line for malicious purposes.

How could that happen? Technically, TR-069 is just a couple of HTTP(S) POST requests and replies which are used to exchange SOAP messages between the ACS and the CPE. The IP address which was used for authentication resides in the field with the lengthy name

InternetGatewayDevice.WANDevice.1.WANConnectionDevice.1.WANIPConnection.1.ExternalIPAddress

of a so-called CWMP Inform message. It should be emphasized that this field is simply part of an HTTP POST body. As a result, the ACS was relying on the fact that the CPE (or my client) only transmits one’s own IP address in that field. However, I once forgot to update my own WAN IP address in that field. Thus, the ACS delivered the VoIP account data of another customer who was then using my previous WAN IP address.

Posted in default | Tagged , , | 2 Comments

New domain, new certificate, new server

Recently, I have purchased the domain heinrichs.io as the IO top-level domain was one of the very few which still had “heinrichs” (my surname) available as a second-level domain. It is meant as the successor of hph.name. Simultaneously, I purchased a vserver to host my blog. Finally, I went for a free DV certificate offered by StartSSL in order to set up proper encryption for my blog. However, a few days later I received a Let’s Encrypt Private Beta invitation. Yesterday, I found the time to set up the Let’s Encrypt certificate and as well as the associated renewal process. So far, everything looks good to me – if you encounter any problems, please let me know. Furthermore, I took the chance to update several pages of my blog. For example, the imprint now comes with a real address of mine instead of an accomodation address. Feel free to direct all correspondence (fan mail, hate mail, love letters, goon squads, gifts, cookies, hardware or job offers) to:

Hanno Heinrichs
Süsterfeldstraße 26
52072 Aachen

P.S.: No, this blog is not dead. “The best is yet to come”…

Posted in default | Leave a comment

Rooting the Sphairon Speedlink 5501

Last week I was asked if I knew how to enable SSH access on a Sphairon (ZyXEL) Speedlink 5501. My previous technique for the HomeBox 3232 (also manufactured by Sphairon) did not work as the expected magic bytes in the configuration backup file of the Speedlink 5501 could not be found. So I had to reverse this new file format to see, if a similar technique can be applied here.

In this post I will explain the details of this new file format. With this knowledge we can unpack, modify and repack config files. Secondly, I will show you what config options have to be modified, in order to enable SSH access. Unfortunately, I have no time to write a ready-to-use tool this time. But anyone is invited to use these results to code their own unpacker. Please let me know, if you publish something so I can link to it from here.

Reversing the config file format

I downloaded the Firmware V4.37.2.4.4 from Deutsche Telekom. Using binwalk two lzma-compressed SquashFS file systems were easily spotted.

$ ./binwalk -m magic.binwalk Firmware_Speedlink_5501_V4.37.2.4.4.bin

DECIMAL         HEX             DESCRIPTION
-------------------------------------------------------------------------------------------------------
1643075         0x191243        uImage header, header size: 64 bytes, header CRC: 0x7AE0421E, created: Fri Jul 18 16:04:14 2014, image size: 9355264 bytes, Data Address: 0x0, Entry Point: 0x0, data CRC: 0xC9D77E84, OS: Linux, CPU: MIPS, image type: Filesystem Image, compression type: none, image name: rootfs#5.0.10.0.3_r81360_heinzm
1643139         0x191283        Squashfs filesystem, little endian, version 4.0, compression: lzma, size: 9352106 bytes, 1207 inodes, blocksize: 65536 bytes, created: Fri Jul 18 16:04:14 2014
[...]
10998403        0xA7D283        uImage header, header size: 64 bytes, header CRC: 0x2C7ABEA3, created: Fri Jul 18 13:55:41 2014, image size: 6889472 bytes, Data Address: 0x0, Entry Point: 0x0, data CRC: 0x28A47D11, OS: Linux, CPU: MIPS, image type: Filesystem Image, compression type: none, image name: servfs#1.0.0_r81360_heinzm
10998467        0xA7D2C3        Squashfs filesystem, little endian, version 4.0, compression: lzma, size: 6887693 bytes, 886 inodes, blocksize: 65536 bytes, created: Fri Jul 18 13:55:40 2014

These filesystems were unpacked using the squashfs-tools from SquashFS 4.3 on a Debian system running 3.2.60 kernel (read here why this is important).

After browsing the first filesystem (named rootfs) it turned out, that it most likely contained no code related to the config file handling. So I started to investigate the second filesystem (named servfs) and quickly found a library called libconfig-export-api.so which sounded interesting to me.

By reverse engineering a part of the library’s code, the config file structure of the Speedlink 5501 could be reconstructed. It uses a 72 byte header followed by a gzipped tar archive (.tgz) of arbitary length.

struct header
{
  char magic[2]; // magic bytes \x45 \x72
  uint16_t unknown; // unknown
  uint32_t timesamp; // big endian unix timestamp of creation
  char tgz_sha1[20]; // SHA-1 hash over tgz archive
  char unused1[12]; // empty
  char header_sha1[20]; // SHA-1 hash from beginning of header up to header_sha1
  char unused2[12]; // empty
};

The header contains two SHA-1 hashes. The first hash, tgz_sha1, is computed over the .tgz archive in which the actual configuration is stored. The second hash, header_sha1, is computed over the first 40 bytes of the header (i. e. up to header_sha1). Therefore, tgz_sha1 must be computed first, when assembling the header.

Enabling SSH access

After you have unpacked the .tgz file, you will have several subdirectories of which one is named sql. Inside you will find several .sql files. Open sql/persistent-network.db.sql with a text editor.

First we will modify the firewall to allow access on port 22. Search for “FirewallRulesStatic” and you will see the existing firewall rules (in my case 9 rules, IDs 0..8).

INSERT INTO "FirewallRulesStatic" VALUES(0,1,'IPv4','0.0.0.0','0.0.0.0',0,0,0,0,'UDP',1,'DROP',1,'INCOMING',0,0,'DEFAULT');
[...]
INSERT INTO "FirewallRulesStatic" VALUES(8,1,'IPv6','::0','::0',0,0,0,0,'ICMP6',3,'ICMPv6Filter',1,'INCOMING',0,0,'system entry');

Simply append a 10th rule (with the ID 9) like this:

INSERT INTO "FirewallRulesStatic" VALUES(9,1,'IPv4','0.0.0.0','0.0.0.0',0,0,22,0,'TCP',4,'ACCEPT',1,'INCOMING',0,0,'system entry');

If you are curious for the syntax, you can scroll up a bit where the table FirewallRulesStatic is created. Most options should be self-explanatory.

Secondly, we will enable the SSH daemon. Search for the line

INSERT INTO "SshConfiguration" VALUES(1,0,5,22,'',0);

and change it to

INSERT INTO "SshConfiguration" VALUES(1,1,5,22,'',0);

Finally, we enable the existing SSH account. Search for

INSERT INTO "SshUser" VALUES(1,0,'admin','admin',0);

and change it to

INSERT INTO "SshUser" VALUES(1,1,'admin','admin',1);

It is advisable to change the username and password as well.

After you have made all your changes, save the .sql file and repack everything back to a .tgz file. Next, compute both SHA-1 hashes and modify the header accordingly. After the config file is uploaded to the router, it will reboot and start a SSH daemon for you.

admin@sphairon.box's password:

BusyBox v1.21.1-sphairon7 (2014-07-18 13:17:33 CEST) built-in shell (ash)
Enter 'help' for a list of built-in commands.

# uname -a
Linux sphairon.box 2.6.32.61-stg-3.26 #2 Fri Jul 18 13:30:05 CEST 2014 mips GNU/Linux
# su
# 
Posted in default | Tagged , , | Leave a comment

Rooting and Looting of the o2 HomeBox 3232

In November 2012 I published a tool which decrypts configuration backup files of Sphairon-based routers. This tool was mainly used by o2 customers who wanted to extract their VoIP login data so they could use any router they prefer – without being tied to the devices supplied by o2. However, as of December 2013 o2 started to roll out a new firmware version (2.12.26.1). With this version they simply stripped all relevant login data from the configuration backup files.

In this post I will show you how you can gain root access to your o2 HomeBox 3232. Using the root access you can easily extract your VoIP credentials, even if you are on firmware version 2.12.26.1. As usual, you will find a German translation of this tutorial in a condensed form at the IP-Phone-Forum.

Things that we will need:

  • o2 HomeBox 3232 connected to the internet
  • Windows PC connected to the HomeBox
  • PuTTY and PuTTYgen (dl putty.exe and puttygen.exe from here)
  • Sphairon Crypto Tool v0.03 (formerly known as “IAD Decrytper”)

Downloads:

Generation of key pair

Download and extract the Sphairon Crypto Tool to a directory of your liking. Download and save PuTTY and PuTTYgen to the same directory. Your folder should look like this:

3232_sshd_1

Now start PuTTYgen, select “SSH-2 RSA” and choose 2048 bits. Click on “Generate”, then move your mouse around in the blank area.

3232_sshd_2

When the generation is done, right-click into newly generated public key, and choose “Select All”. Then, right-click again and choose “Copy”.

3232_sshd_3

Without closing PuTTYgen, navigate to the data directory and open the empty file pubkey.txt. Now paste your public key into that file, then save and close it. (Note: I am using Notepad2 instead of MS Notepad, but MS Notepad will do fine as well for this task.)

3232_sshd_4

Return to PuTTYgen. If you want, you can protect your key with a passphrase, but I will omit this step as this keypair is only a temporary one for breaking into the router. Anyways you should keep the private key (*.ppk file) secret. Click “Save private key” and save it without passphrase. After that you can close PuTTYgen.

3232_sshd_5

You now have successfully generated a keypair which we will later use for SSH access to the router.

Enabling SSH access

The next step is to enable SSH access. Each config.bin which you download from your o2 HomeBox 3232 contains a file called rc.conf. This file has various configuration options like SSH_LAN_ENABLE, TELNET_LAN_ENABLE and so on. Unfortunately we cannot use these options right away as the firmware prevents execution of the Dropbear SSHd on LAN for production type devices. Getting the device into debug mode would require a change to the bootloader options and that would require a way to write to the flash chip. In addition you would risk bricking your router if you mess this up.

Instead, we will do this via a bug in the configuration file handling in the router. The idea is to give the router a specially crafted configuration file which will trigger the bug and enable an SSH daemon for us.

Log into your router on http://o2.box/ to download a copy of your configuration.

3232_sshd_6

Note: My screenshot shows an old Alice firmware version (2.12.14), but this procedure works equally well on the most recent o2 firmware 2.12.26.1.

Save it to the same folder that contains your private key. Your folder should now look exactly like this.

3232_sshd_7

Now execute the batch file enable_sshd_report.bat and let it do its magic. It will generate a new file called config_sshd.bin and store your old configuration as config_original.bin. In addition, a report of this step will be created.

3232_sshd_8

How the “exploit” works: enable_sshd_report.bat decrypts your configuration file. It then appends code for SSHd startup, public key authentication and firewall modification to the option SYSLOGD_CMDLINE in rc.conf. Finally, the manipulated rc.conf is encrypted and saved as config_sshd.bin. Primarily SYSLOGD_CMDLINE is intended to hold command line parameters for the syslog daemon. But due to a lack of input checking, any shell command that you append will be executed.

Go back to the webinterface of your router and upload the config_sshd.bin. Your device will reboot automatically after the upload.

3232_sshd_9

Note: My screenshot shows an old Alice firmware version (2.12.14), but this procedure works equally well on the most recent o2 firmware 2.12.26.1.

If you want to disable the SSHd again, read below.

Setting up PuTTY for SSH access

Your router should now have restarted and the Dropbear SSHd should be accepting connections. Start PuTTY. Assuming that 192.168.1.1 is the IP address of your router you can copy all settings (green) from the following screenshot. Then click on “Auth” (blue).

3232_sshd_10

Browse for the private key (*.ppk file) that you created earlier (green). Then click on “Session” (blue).

3232_sshd_11

Hit “Save” (green) and double-click on “o2 HomeBox 3232” (blue).

3232_sshd_12

Answer the question of trust with “Yes” and you should be prompted to log in. Type “root” (without quotes) and hit return.

3232_sshd_13

Congratulations. You now have root access to your o2 HomeBox 3232.

Extraction of VoIP data

Using the following commands you can conveniently print the VoIP login data to the shell. Just paste them into PuTTY by right-clicking into its window when it shows “#”. Then, hit return.

sed -n "/\[SipAccount\]/,/\[Codecs\]/p" /flash/database.txt
sed -n "/PPPOE1_USERNAME\=\"/,/PPPOE1_PASSWORD\=\"/p" /flash/rc.conf
sed -n "/PPPOE2_USERNAME\=\"/,/PPPOE2_PASSWORD\=\"/p" /flash/rc.conf

In my case the first command produces the following output:

# sed -n "/\[SipAccount\]/,/\[Codecs\]/p" /flash/database.txt
[SipAccount]
0;0;"xxxxxxxxxxxx";"xxxxxxxxxxxx";"yyyyyyyyyyyyyyyyyyyyyyyyyyyyyyyy";"";4500;1;0;"";0;0;0

[SipProvider]
0;0;1;2;0;"Hansenet";"sip.alice-voip.de";10000;19000;1;"1/20_12_5";1;0;0;1;"";0;0;0;1;1;"";1;1;0;0;0;0;0

[SipServer]
0;"registrarZZ.sip.alice-voip.de";5060
1;"registrarZZ.sip.alice-voip.de";5060
2;"registrarZZ.sip.alice-voip.de";5060

[Codecs]

Under [SipAccount] you find my username twice (xxx…) and my password (yyy…). My Proxy is “sip.alice-voip.de” as in [SipProvider]. “registrarZZ.sip.alice-voip.de” is my registrar and it is stored under [SipServer].

The second and third command reveals the username/password for each PPPoE circuit and the result should be self-explanatory.

# sed -n "/PPPOE1_USERNAME\=\"/,/PPPOE1_PASSWORD\=\"/p" /flash/rc.conf
PPPOE1_USERNAME="xxxxxxxxxxxx@alice-dsl.de"
PPPOE1_PASSWORD="xxxxxxxx"
# sed -n "/PPPOE2_USERNAME\=\"/,/PPPOE2_PASSWORD\=\"/p" /flash/rc.conf
PPPOE2_USERNAME="xxxxxxxxxx-xxxxxx@alice-voip.de"
PPPOE2_PASSWORD="xxxxxxxxxx"

With these credentials at hand you should be able to set up your own router for o2 VoIP telephony. If you need further assistance with the setup, please consult this thread in the IP-Phone-Forum (step 6).

Disabling SSH access and removing traces

If you simply want to disable the SSH daemon, it is enough to upload the config_original.bin through the webinterface. However, if you want to remove all traces of the manipulation (e. g. you want to RMA your device), you have to do the following:

  • Log into your router via PuTTY.
  • Issue the following commands:
rm /flash/pwned
sed -i '2d' /flash/authorized_keys
  • Upload config_original.bin through the webinterface of your router.

After the reboot, all traces of the manipulation will be gone.

Acknowledgment & other thoughts

I would like to thank the user Black-Roses from the IP-Phone-Forum for testing this procedure on the most recent o2 firmware.

Once you have SSH access enabled, there are several other interesting things you can do:

  • dump the whole flash (for example to a USB thumb drive)
  • up and downgrade to other firmware versions
  • lock out o2 from SSH by removing their key from /flash/authorized_keys
  • disable TR-069 functionality
  • gain more understanding of the firmware and build a custom one with extended functionality

If you have any other ideas or plan to investigate any of the above, I would be glad to hear from you. 🙂

Update 2014-07-29: If you want to make your own manipulations on the rc.conf, you can do so through SSH by editing the file /flash/rc.conf with vim (reboot, after you are done). Alternatively, you can use the batch files decrypt_unpack_cfg.bat and pack_encrypt_cfg.bat. This way, you can unpack your config.bin, modify the files in the config directory and repack them again.

Posted in default | Tagged , , | Leave a comment

AVM FRITZ!Box remote command injection vuln

Today I am featured in an article on heise.de. Have fun reading and do not forget to update your FRITZ!Box 😉

Posted in default | Tagged , | 1 Comment

Arcadyan IAD Decrypter v0.05 released

Today I would like to announce a major update to the Arcadyan IAD Decrypter which you might know from the IP-Phone-Forum or from my previous blog post. It is now capable of decrypting the new “OBC6” configuration backup file format used in Arcadyan routers such as o2Box 6431. However special steps have to be taken if you want to use this method to recover your VoIP credentials (vide infra).

What has happend since February?

Firmware versions up to 1.01.22 used the “CFG5” format which could be decrypted by my old Decrypter (v0.04). Somewhere around the end of September 2013 o2 started to roll out a new firmware (version 1.01.23b) to their o2Box 6431 devices. With this updated firmware the configuration backup layout was changed in a way that my previous v0.04 version of the Arcadyan IAD Decrypter could not handle it anymore.

Obfuscation and more obfuscation

When analysing the new firmware I found out that o2 (or Arcadyan) have made an effort to thwart static analysis of their binary. They have introduced some kind of control flow obfuscation. Call addresses of interesting functions which implement their new file format are now computed dynamically (at runtime). In a nutshell their “protection” works like this:

  1. During the boot process the addresses of all protected functions are linked to a unique number in a hash table (see picture).obf setup
  2. Static calls to protected functions are replaced by a lookup/trampoline function which fetches the original address from the hash table by its unique number. Control flow then resumes at the result of the lookup (see picture).obf trampoline
  3. The arguments to these protected functions are either passed via a memory section which is maintained by the protection or by fetching the local variables from the previous stack-frame via an additional pointer.
  4. The protected functions start with some extra code to restore the arguments from the according source to the original argument registers $a0, $a1, …

This mechanism could be defeated easily by two IDA Python scripts. One which builds the hash table with the information from the boot process. For each call to a protected function a second script then looks up the original address in the hash table by its unique number and places the result as a comment next to the protected/dynamic call.

It turned out that most of the old “CFG5” config scheme remained the same. Only at two places there was some XOR-functionality added: right before and after the second decryption step of the “CFG5” format. These additional XOR operations process the intermediate buffers which hold the semi-decrypted config file. In “OBC6” format they contain a preceding 0xA0 byte large table (more precisely: two tables, 0x80 and 0x20 bytes). After that follows the ciphertext/plaintext which contains a variable number of 4-byte long “tags”. These tags determine the distance to the next tag as well as the starting index within the 0x80 byte table. The bytes between two tags are XOR’ed with the chars from the 0x80 byte table. Finally all chunks are concatenated, the new size of the merged chunks is returned and the buffers are processed the same as in “CFG5” format.

What are you o2/Arcadyan guys trying to achieve with your obfuscation techniques? Wouldn’t it make more sense to focus on improving the quality and features of your SOHO routers instead of adding even more obscurity to your configuration file format? If o2 customers were satisfied with what you deliever how do you explain 103.000 hits/8.000 downloads/640 replies of people who want to replace your router in this thread? And that does not even include people who only read my blog, other blogs (here and here) or the o2 forum itself.

Even Hansjörg Schmidt, member of the parliament of Hamburg, dislikes “Zwangsrouter” as he posted on twitter:

Drecks Zwangsrouter kann eingemottet werden. Firmware entschlüsselt & Passwörter ausgelesen. Fritz!Box läuft. Eat this, O2! #fb

Obtaining VoIP login data from firmware 1.01.23b

When looking at the obtained plaintext it turned out that all PPPoE or VoIP login credentials were empty. A closer look revealed that the important parts are censored from the config backup file each time a user downloads it through the web interface. Well played Arcadyan.

To my delight I can still provide another way to obtain your login data: Open your router 6431 pinoutand attach a USB-TTL cable to it. If you Foto 23.11.13 15 14 32don’t have such a cable you can get them on eBay for a few bucks. Just search for “USB DATENKABEL NOKIA 7360 7710”. You can rip off the cellphone dock connector and add your own female connectors.

The pins are already placed on the PCB and so no soldering is required on your router. The pinout is as follows (see picture as well):

Pin 4: ground
Pin 3: RX of router connect to TX of cable
Pin 2: TX of router connect to RX of cable
Pin 1: not connected (pin is marked with a white triangle on PCB)

You can then interrupt the bootloader and dump the flash chip with the help of brntool and the following command:

For o2Box 6431 run:
brntool.py --serial COMx --read=o2Box6431.bin --addr=0xB0040000 --verbose --size=0x40000

For o2Box 4421 run:
brntool.py --serial COMx --read=o2Box4421.bin --addr=0xB0020000 --verbose --size=0x40000

Now you can use my new version of the Arcadyan IAD Decrypter to obtain your PPPoE and VoIP data from that file even if you are on firmware version 1.01.23b.

arcadyan_dec.exe -d o2Box6431.bin o2Box6431_decrypted.bin > o2Box6431_output.txt
strings.exe o2Box6431_decrypted.bin > o2Box6431_strings.txt

For more detailed information on how to dump the flash see this thread (German language).

Acknowledgment

Special thanks go to Daniel Meyerholt, astraflo and Jan Newger. “You know who you are” 😉

tl;dr

Arcadyan IAD Decrypter v0.05 published. However VoIP credentials of 1.01.23b firmware can only be obtained by dumping the flash.

Posted in default | Tagged , , , | Leave a comment

Extract VoIP login data from o2 Box 4421 and o2 Box 6431

Please note, that the information presented in this post may be outdated. An updated technique has been posted here.

The German ISP o2 (which has acquired the brand “Alice” from HanseNet in 2010) tries to prevent its customers from installing and using their own CPE by keeping the VoIP credentials secret. They ship poorly equipped routers/modems manufactured by Sphairon or Arcadyan which use the TR-069 protocol to transfer these secret credentials to the CPE.

In my previous post I published a tool to decrypt backup files from Sphairon CPE so any customer who owns a Sphairon device can easily obtain the secret VoIP data. Arcadyan however uses a different encryption scheme for its backup files. A backup decryption tool for older firmware versions is available at the IP-Phone-Forum. As of Sep-2012 a new firmware version was rolled out which rendered the old tool useless.

Therefore I have reverse engineered a part of that recent Arcadyan firmware (1.01.18) in order to gain knowledge about the encryption scheme. After that I have implemented the decryption in C. My code uses the SCZ library for decompression.

You can grab my tool Arcadyan IAD Decrypter below. It has been tested against config backups from o2 Box 4421 (Arcadyan IAD 4421) and o2 Box 6431 (Arcadyan IAD 6431). It will probably work for more Arcadyan devices. For updated information and a brief introduction on how to use my tool please see the corresponding thread in the IP-Phone-Forum.

Many thanks go out to Daniel Meyerholt for providing a firmware dump, identifying the decompression algorithm as well as fruitful discussion. I would like to thank Stefan Viehböck for his blog .braindump in which he provides excellent information on how to descramble and unpack firmware images of Arcadyan devices.

The source code is not yet publicly available but I have handed it to Daniel Meyerholt. He has plans to write a set of open-source tools for Arcadyan firmware image manipulation in Java. My source code will be re-implemented in Java and published within his open-source project. I will keep you updated as soon as he publishes it.

Posted in default | Tagged , , , | 1 Comment

Extract VoIP login data from an Alice IAD 3232 backup file

Please note, that the information presented in this post may be outdated. An updated technique has been posted here.

The German ISP o2 Alice Hansenet enforces their customers to use the router that is distributed to them along with the contract. While they supply you with PPPoE data for internet connectivity, your VoIP login credentials are kept secret within the router. The o2 Alice device examined for this post is called “IAD 3232” and was manufactured by the German company Sphairon.

In this post I will show you how to extract your VoIP data from a configuration backup file which can be downloaded through the IAD 3232 web interface. Since Sphairon uses the same backup file structure and encryption scheme on most (if not all) their devices, this technique is quite generic. Any comments should be posted to the corresponding thread in the IP-Phone-Forum.

Confirmed devices on which this technique works: IAD 3221, IAD 3222, IAD 3231, IAD 3232, o2 HomeBox 3232, Turbolink IAD.

How it works

1. Go to the web interface of your IAD (http://alice.box/) and download a copy of your router configuration to your hdd: “System” -> “Einstellungen sichern” -> “Konfiguration speichern”. A download dialog for a file called config.bin should pop up.

2. Grab my Sphairon IAD Decrypter tool and save it to the same location as your config.bin. Now use the decrypter to convert your config.bin to a file called config.tgz. My tool does not contain any harmful code. Please run it in any type of sandboxed or virtualized environment if in doubt.

3. Open the .tgz file (with WinRAR for example) and extract the contained files database.txt and rc.conf.

4. As o2 Alice uses a second PPPoE connection for VoIP services (PVC) you need to extract these login credentials. Open rc.conf and look for the following section:

#<< wan_pppoe2
[...]
PPPOE2_USERNAME="<voip pppoe username>"
PPPOE2_PASSWORD="<voip pppoe password>"
[...]
#>> wan_pppoe2

Set up your new VoIP router to establish a second PPPoE connection for telephony with this account data. Set VPI to 1 and VCI to 32. Change “VCI” to 35 if you get “request denied” error for your telephony PPPoE connection. (Thanks to mcgiovanni88 for the solution).

Note: My username is equal to “<10 digit serial number>-<first 6 hex digits of mac address>@alice5-voip.de” and my password is “nopw”. The data encoded into the username can be found (at least in my case) on the label under your IAD 3232. That is probably not always the case so you should stick to what is in your rc.conf.

5. Open database.txt in a text editor (Notepad2 for example) and look for the following sections:

[SipAccount]
0;0;"<telephone number1>";"<username1>";"<password1>";"";4500;1;0;"";0;0;0
1;0;"<telephone number2>";"<username2>";"<password2>";"";4500;1;1;"";0;0;0
2;0;"<telephone number3>";"<username3>";"<password3>";"";4500;1;1;"";0;0;0

[SipServer]
0;"<registrar1>";5060
1;"<registrar2>";5060
2;"<registrar3>";5060

The above example contains 3 VoIP telephone numbers, each with their own username, password and registrar. Input this data to your desired VoIP device/router.

Note: In my example each telephone number was equal to the according username. Furthermore all registrars were equal. That is probably not always the case so you should stick to what is in your database.txt.

6. If you did do everything right you should now have your telephone numbers up and running.

Other interesting stuff

The file rc.conf seems to contain the login credentials for an ftp server containing firmware updates. Furthermore you will find some root-user password hashes for samba, ftp and telnet. If you manage to crack any of the hashes or if you reverse engineer any of these images I would be happy to hear of your results.

#<< firmware_update
FTP_SERVER="update-sph.hansenet.net"
FTP_USERNAME="updatesph"
FTP_PASSWORT="DidFS4anSRd2t9ks"
FTP_REMOTE_DIR="/Alice_Modem_WLAN_1232"
#>> firmware_update

FAQ

1. What is the magic behind your tool and how did you write it?
There is no “magic”. I simply dumped the flash chip with the help of the bootloader through the TTL interface on the PCB of the router. Next I unpacked the rootfs (thanks to “Firmware Modification Kit“) and reverse-engineered the binary that creates the config.bin. Once the file structure and the encryption algorithm were understood, I simply wrote a decryption routine.

2. Is the source code available?
No.

3. Will you make the file structure and the encryption scheme publicly available?
Yes. Please credit me if you use information gathered by me. Thanks.

The config.bin file structure consists of a 0x30 byte header followed by a ciphertext of payload_size_be length.

struct header
{
  char magic[4]; // magic bytes \x43 \x46 \x47 \x31 (CFG1)
  uint32_t payload_size_be; // length of ciphertext = length of padded plaintext (big endian)
  char header_md5[8]; // first 8 bytes of MD5 computed over header (assuming the 8 bytes of "header_md5" are \x00)
  char etl[7]; // blank electronic label (etl), always "000000" (null-terminated char array)
  char unused1; // not used at the moment
  uint16_t password_len_be; // length of the password used in AES encryption (big endian)
  uint16_t padding_len_be; // number of padding bytes added to plaintext (big endian)
  char unused2[4]; // not used at the moment
  char plaintext_md5[16]; // MD5 hash of the plaintext
};

The ciphertext gets decrypted by AES256 in ECB mode with the static key aes_key. Why don’t they use a hardware-based secret for encryption, if they don’t want to bother the user to enter a password? Why do they store the length of the secret along with the ciphertext? Why don’t they use a hash function for key derivation?

const char aes_key[32] =
{
  // "dummy"
  0x64, 0x75, 0x6d, 0x6d, 0x79, 0x00, 0x00, 0x00,
  0x00, 0x00, 0x00, 0x00, 0x00, 0x00, 0x00, 0x00,
  0x00, 0x00, 0x00, 0x00, 0x00, 0x00, 0x00, 0x00,
  0x00, 0x00, 0x00, 0x00, 0x00, 0x00, 0x00, 0x00
};

Finally, padding_len_be bytes at the end of the plaintext are stripped and the resulting buffer is written to config.tgz.

Posted in default | Tagged , , , | 2 Comments

How FTPRush encrypts site passwords

FTPRush (formerly known as “UltraFXP”) is a  popular closed-source freeware FTP Client for Windows and comes with some handy features.

If the user chooses to store site passwords FTPRush applies some cryptography to the plaintext password before writing it to RushSite.xml. In this post I will explain in detail the key setup, algorithm and mode of operation utilized. The source code of a sample implementation is available for download.

The RushSite.xml file holds all account data like IP, port, protocol, username, encrypted password, etc. FTPRush offers the user to encrypt the whole RushSite.xml file with a user-defined password via a non-disclosed algorithm. This might be covered in one of my later posts.

Key setup & algorithm

char secret[16] = "th3m3ugaysshit9";
char IV_init[8] = {
    0xff, 0xff, 0xff, 0xff, 0xff, 0xff, 0xff, 0xff
};

The “secret” string “th3m3ugaysshit9” is being hashed using RIPEMD-256. The output digest serves as the key to a default 16 round blowfish algorithm. Next IV_init is encrypted once through blowfish in ECB mode to yield the 8 byte IV which is used as an initialization vector for the mode of operation. IV itself gets encrypted again by blowfish in ECB mode and the result is stored to IV_short (see short passwords).

// both vectors and key are constant as the "secret"
// from which they are derived is constant as well
char key[32] = {
    0xb4, 0xe8, 0xd1, 0x6c, 0x26, 0x32, 0x3d, 0x4a,
    0xea, 0x80, 0x26, 0xcd, 0xce, 0xbf, 0xfe, 0x6a,
    0x4a, 0xe2, 0x7d, 0xeb, 0x77, 0xf0, 0x89, 0x4c,
    0xbc, 0x25, 0xfa, 0x03, 0xe0, 0x1b, 0x6b, 0x1c
};
char IV[8] = {
    0x3b, 0xc5, 0x1f, 0x5a, 0x5e, 0x96, 0x13, 0x45
};
char IV_short[8] = {
    0x2b, 0x74, 0x73, 0xd3, 0x99, 0x49, 0x10, 0x55
};

Short passwords

For passwords less than 8 characters FTPRush performs an XOR operation on the password with IV_short until it reaches the end of the password. The result is directly written to disk. Note that for short passwords the blowfish encryption does not add any security as it is merely used for key derivation purposes and IV_short is always the same due to the constant “secret” char array.

Longer passwords & mode of operation

Plaintext passwords with at least 8 characters are encrypted by FTPRush with the blowfish algorithm in a custom CBC mode as shown below (modifications drawn red). The author obviously used the Delphi library “delphidec” for all the crypto stuff. As I could not find an old version of that library I cannot tell whether this mode was a feature from the library authors or a bugged CBC implementation. At least the current library (version 5.2 as of writing this blog entry) does not offer such a mode. I am not an expert in cryptography so I have no idea if this modification enhances or weakens the cryptographic stength. Maybe it was just added by the UltraFXP/FTPRush authors for obscurity reasons. If anyone knows more about this I would love to hear from you.

FTPRush custom CBC mode. Original image stolen from wikipedia.

If password’s length is not a multiple of 8 FTPRush then takes the feedback from the last custom CBC block and encrypts it by blowfish in ECB mode. I called the result IV_modulus. IV_modulus is then XOR’ed with last bytes of the plaintext password. This is the same fashion as for short passwords except that the XOR vector is not constant anymore. The result is written to RushSite.xml as the encrypted site password.

Sample implementation

I have implemented the algorithms used for encryption and decryption in a small C project (vide infra). It uses the crypto library LibTomCrypt v1.17. The source code and the necessary modifications to that library are included as well as a precompiled executable.

Open questions and closing words

  • What does the message in the “secret” char array mean?
  • Why was a modified CBC employed instead of a normal CBC?

If you have any ideas about that I would love to hear your opinions.

So much for my very first blog entry. I hope you enjoyed reading 🙂

Posted in default | Tagged , | Leave a comment